
CLI identity · Quickstart
Quickstart to Launcher Bundles
Give an unsigned command-line tool an identity you can use in Automic Vault policy, while keeping its ordinary command.
September 23, 2026
You have a CLI harness that starts agents, runs developer tools, and needs access to protected credentials. You want to let it read from GitHub without letting it push changes or print your token. Automic Vault can make those distinctions, but first it needs to verify which software initiated the operation.
An unsigned executable at a familiar path cannot provide that identity. Other code running as you may be able to replace the file. If we trusted its filename, the replacement would inherit the same authority.
With a Launcher Bundle, we package one fixed native executable in a signed macOS app, enable Hardened Runtime, and enroll that exact generation. You review the artifact once. Automic Vault rechecks its identity and integrity whenever it requests a gated operation.
Do you need one?
Use a Launcher Bundle for an unsigned native CLI that you want to treat as a Launcher: the software at the root of an operation’s verified launch chain. Agent harnesses and long-running command-line automation are useful examples.
An eligible vendor-signed app or standalone CLI can already qualify as a Verified Launcher. Check the executable with av doctor <command> before bundling it.
The bundle creator accepts one Mach-O executable, the native macOS binary format. It does not package shell scripts, JavaScript or Python source, or a directory of dependencies. Bundling an interpreter would identify the interpreter, without authenticating the mutable code it loads.
You need Automic Vault and its installed av CLI. Creating a bundle requires no Apple Developer account or signing certificate. Installation requires administrator authorization.
1. Choose the executable
Open Launcher Bundles in the Automic Vault sidebar and click + to create one. Choose the native CLI executable, then enter its Name and Command. The name labels the bundle; the command is what you will type in your shell.
These captures use herdr. Substitute your own executable. In the file picker, Command-Shift-G lets you enter a path such as /opt/homebrew/bin/herdr; Automic Vault resolves the symlink to its underlying executable.
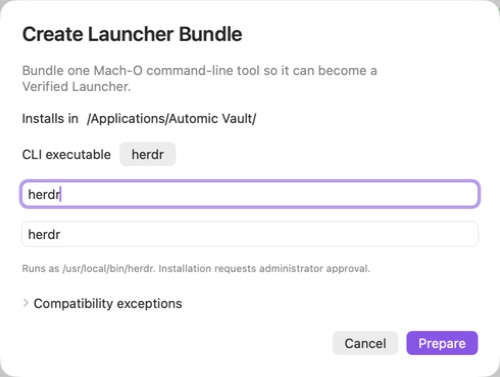
The compatibility options allow JIT compilation, unsigned executable memory, or disabled library validation. Enable an exception only when the CLI requires it. Disabling library validation lets third-party libraries and plug-ins run inside the Launcher and inherit its authority.
2. Prepare, review, and enroll
Click Prepare. Automic Vault snapshots the executable and signs the payload and generated app with Hardened Runtime. Review the command, installation location, runtime settings, and entitlements before continuing.
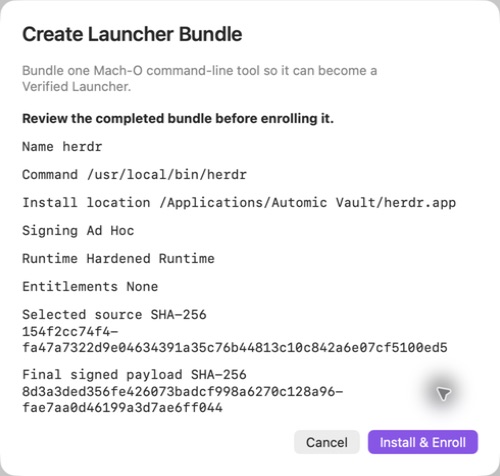
The two SHA-256 hashes describe different artifacts: your selected source and the final signed payload. Signing changes the executable, so different hashes are expected. Automic Vault pins the final payload as part of enrollment.
Click Install & Enroll and complete administrator authorization. Automic Vault installs the bundle under /Applications/Automic Vault/ and its command link under /usr/local/bin/. Both are root-owned, with protection against ordinary user writes. If an unrelated command already occupies the link path, installation refuses to overwrite it.
3. Verify the command you will run
Check the installed command from your shell:
av doctor herdrDoctor checks the command link and its position in PATH. Another installation, such as the Homebrew original, might still resolve first. Correct that ordering before using the command, then run Doctor again.
Invoke herdr with its usual arguments. The command link starts the bundle’s launcher, which runs the fixed payload inside the app and forwards the arguments and exit result.
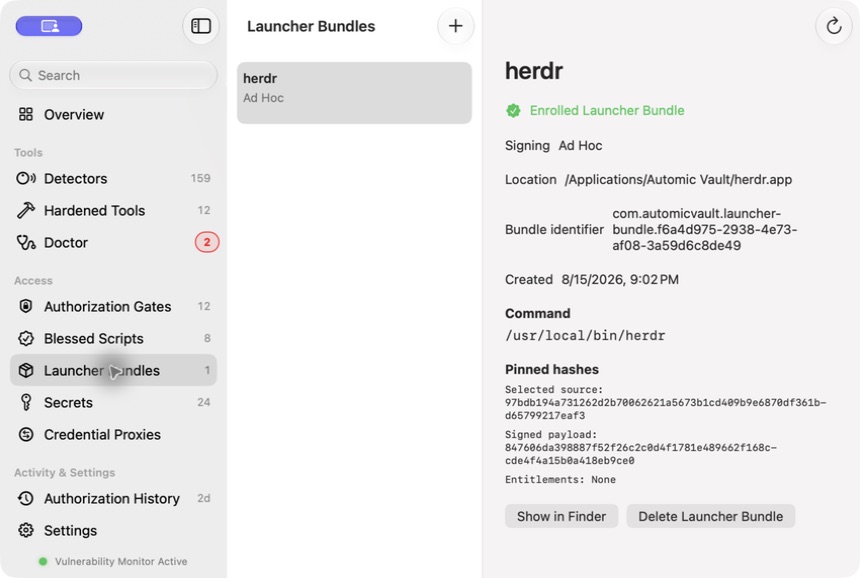
The original executable remains separate. Updating or invoking that original does not update the bundle or give it the bundle’s identity.
4. Choose its access at each gate
Enrollment lets the running bundle qualify as a Verified Launcher. Automic Vault then applies each Authorization Gate’s existing default, or a matching Launcher-specific rule. Enrollment does not grant unrestricted credential access.
Open Authorization Gates, select the relevant Tool, and add the installed bundle from /Applications/Automic Vault/ to its Launcher-specific policy. Choose the narrowest Access Level that covers the work.
For example, after hardening gh, give the bundle Read Only access at the GitHub gate. Recognized reads can proceed under policy; writes and raw token disclosure still require Approval. Choose Approval Required if you want a human decision for each request. Unknown operations require Approval at every Access Level.
Bundling the harness and hardening the tools it invokes address different parts of the workflow. The bundle gives the harness a verifiable identity. Tool hardening brings supported credential use through an Authorization Gate.
What we check under the hood
Automic Vault uses ad-hoc signing to seal this exact build and enable Hardened Runtime. Hardened Runtime reduces code-injection risk through macOS runtime protections, subject to the compatibility exceptions you accepted. The signature does not establish a publisher identity. We keep separate enrollment evidence in the app’s Data Protection Keychain, binding the bundle generation, signed code identities, final payload digest, and accepted runtime protections.
At launch, the small runner starts its fixed payload suspended. It checks the child’s live code identity against the identity sealed into the runner, then allows execution. It never searches PATH for a replacement payload.
At authorization time, Automic Vault checks the live process, nested signatures, enrolled generation, payload digest, managed location, and runtime protections again. A changed, moved, re-signed, or unenrolled bundle fails these checks. Automic Vault denies its request instead of falling back to an Approval prompt.
After verification, Automic Vault evaluates the complete operation: the Launcher, Gate Client, Target, command, arguments, working directory, requested Secret Names, and selected Secret Value sources. Before releasing a protected Secret, it persists and verifies an Authorization Record.
A payload that daemonizes can continue representing its own enrolled bundle after the runner exits, provided its exact live identity still verifies. You do not need to enable detached-process access for this.
Update through a new generation
To update, create a bundle with the same name from the new executable and review it again. After successful replacement, Automic Vault revokes the old enrollment and its Launcher-specific rules, and moves the old bundle to Trash. Gate defaults apply to the new generation until you set its Launcher-specific rules.
We require that review because you are delegating authority to a particular artifact. An upstream update should not inherit the old generation’s exceptions and grants without your decision.
Code signing establishes identity and integrity, not intent. You still need to trust the executable, its configuration, plug-ins, and the work you ask it to do. A Launcher Bundle does not sandbox every command or make a Target keep a Secret confidential after receiving it.
For the exact requirements, see Signed CLI Launchers, the canonical Launcher Bundle definition, and the Launcher Packaging architecture.